Battery switch on travel trailer function is crucial for managing your RV’s power. Understanding how your battery switch works is key to preventing dead batteries, electrical issues, and ensuring a smooth camping experience. This guide breaks down the different types of switches, their locations, safe operation, troubleshooting tips, and essential maintenance practices. We’ll cover everything from identifying your switch type to performing basic maintenance, empowering you to confidently handle your travel trailer’s electrical system.
This detailed explanation will cover various aspects of your travel trailer’s battery system, including diagrams and step-by-step instructions to help you master the intricacies of its operation. We’ll also address common problems and offer practical solutions to keep your power running smoothly on the road.
Battery Switch Types in Travel Trailers
Understanding your travel trailer’s battery switch is crucial for managing power and preventing accidental drain. These switches control the flow of electricity from your batteries to your trailer’s systems. Different types offer varying levels of control.
Battery Switch Types
Travel trailers typically use one of several types of battery switches. These switches control the power flow between your house batteries and the trailer’s electrical system. The most common types are the 1-2-Both and the 1-2-Off switches. Less common are simple on/off switches.
| Type | Functionality | Pros | Cons |
|---|---|---|---|
| 1-2-Both | Position 1: Connects only battery 1 to the trailer’s electrical system. Position 2: Connects only battery 2 to the trailer’s electrical system. Position Both: Connects both batteries in parallel to the trailer’s electrical system. | Provides flexibility in managing battery usage and allows for charging individual batteries separately. Useful if one battery needs maintenance or replacement. | More complex to understand and operate than simpler switches. |
| 1-2-Off | Position 1: Connects only battery 1 to the trailer’s electrical system. Position 2: Connects only battery 2 to the trailer’s electrical system. Position Off: Disconnects both batteries completely from the trailer’s electrical system. | Offers complete isolation of the batteries from the trailer’s electrical system, preventing parasitic drain. | Slightly less flexible than a 1-2-Both switch as it doesn’t allow for simultaneous use of both batteries. |
| Simple On/Off | Position On: Connects all batteries to the trailer’s electrical system. Position Off: Disconnects all batteries from the trailer’s electrical system. | Simple and easy to understand. | Offers no control over individual batteries, limiting flexibility and troubleshooting capabilities. |
Identifying Your Battery Switch Type
Locating and identifying the type of battery switch in your travel trailer is a straightforward process. First, locate the battery compartment. The switch is usually found near the batteries themselves, often mounted on the wall or inside the compartment. It will be a rotary switch with several positions clearly marked. Examine the markings on the switch itself.
The labels will directly indicate the type of switch—for example, “1-2-Both,” “1-2-Off,” or simply “On/Off.” If the markings are unclear or worn, carefully trace the wiring from the switch to determine which components it connects.
Battery Switch Location and Accessibility
Finding your travel trailer’s battery switch quickly can be crucial, especially in emergencies or when performing routine maintenance. Knowing its location and ensuring easy access are key to safe and efficient operation. This section details common locations and emphasizes the importance of accessibility.The placement of the battery switch varies significantly depending on the manufacturer and model of your travel trailer.
Some common locations include near the battery itself (often under an exterior access panel), inside a compartment near the tongue, or even within a dedicated electrical bay inside the trailer. Less common, but possible, locations include inside the main storage compartment or even in a roadside access panel. However, the most important consideration is ease of access for both routine checks and emergency shut-offs.
Optimal Battery Switch Placement
An optimally placed battery switch should prioritize safety and ease of access. Ideally, it should be readily visible and accessible without requiring tools or extensive maneuvering. The location should minimize the risk of accidental contact or damage. It should also be positioned to avoid being obstructed by other equipment or covered by debris.Imagine a schematic: The battery is located in a dedicated compartment on the trailer tongue, protected by a weatherproof cover.
A clearly labeled, easily accessible battery switch is mounted on the exterior of the compartment, directly above the battery but slightly offset to prevent accidental contact. The switch itself is a heavy-duty, weatherproof type with a clearly visible ON/OFF indicator. The compartment is secured with a latch, preventing accidental opening and protecting the battery and switch from the elements.
So, you’re planning a trip? Awesome! Don’t forget travel insurance! Check out aon travel insurance for comprehensive coverage. They offer a wide range of plans, so you can find one that fits your needs and budget. Then, once you’ve got that sorted, look into aon travel insurance as well; comparing options is key to getting the best deal.
Remember, peace of mind is priceless, especially when you’re exploring new places!
This placement allows for quick access in emergencies while minimizing the risk of accidental activation or damage.
Troubleshooting Common Battery Switch Issues
Your travel trailer’s battery switch is a crucial component, controlling power to your appliances and systems. Problems with this switch can leave you stranded without power, so understanding common issues and how to troubleshoot them is essential for any RV owner. This section will guide you through diagnosing and resolving some typical battery switch problems.
No Power to the Trailer
This is the most common issue. The problem might lie within the switch itself, the wiring, or even a blown fuse. First, verify the batteries are properly charged and connected. Then, visually inspect the switch for any obvious damage, loose connections, or corrosion. Clean any corroded terminals with a wire brush and baking soda solution.
If the switch appears fine, check the fuses both at the battery and within the trailer’s electrical panel. Replace any blown fuses. If the problem persists, trace the wiring from the battery switch to the trailer’s power distribution center. Look for broken or loose wires. Repairing loose connections is a simple DIY fix, while more extensive wiring problems may require professional assistance.
Step 1: Check battery charge and connections.
Step 2: Inspect the battery switch for damage, loose connections, or corrosion. Clean if necessary.
Step 3: Check and replace blown fuses at the battery and in the trailer’s electrical panel.
Step 4: Inspect wiring from the switch to the power distribution center for breaks or loose connections. Repair as needed.
Step 5: If the problem continues, consult a qualified RV technician.
Overheating Battery Switch
A hot battery switch indicates excessive current flow, potentially caused by a short circuit somewhere in the system. This is a serious issue that requires immediate attention to prevent fire hazards. Never attempt to repair an overheating switch yourself. The high temperatures can cause damage that is difficult to detect visually. Instead, immediately disconnect the battery cables to cut off the power.
So, you’re planning a trip? Awesome! Before you jet off, remember travel insurance is key. Check out aon travel insurance for comprehensive coverage. They’ve got you covered for medical emergencies, lost luggage – the whole shebang. And if you’re looking for another great option, aon travel insurance also offers solid plans; compare both to find the best fit for your adventure.
Don’t leave home without it!
Then, call a qualified RV technician to diagnose and repair the short circuit. They have the tools and expertise to safely locate and resolve the underlying problem.
Step 1: Immediately disconnect the battery cables.
Step 2: Contact a qualified RV technician for diagnosis and repair. Do not attempt to repair the switch yourself.
Battery Switch Feels Loose or Wobbly, Battery switch on travel trailer function
A loose or wobbly switch suggests a poor connection, possibly leading to intermittent power or complete power failure. Tighten any visible screws securing the switch to its mounting bracket. If the switch remains loose, this might indicate damage to the mounting bracket itself or the switch mechanism. In this case, replacement is likely necessary. While replacing the switch is a moderately advanced DIY task, ensuring a secure and proper installation is crucial.
If you’re uncomfortable tackling this, seeking professional help is recommended.
Step 1: Tighten screws securing the switch to its mounting bracket.
Step 2: If the switch remains loose, consider replacing the switch. Seek professional help if unsure.
Battery Switch and its Impact on Electrical Systems: Battery Switch On Travel Trailer Function
The battery switch in your travel trailer acts as the central control for your power sources, determining which battery (or batteries) supply power to the various electrical components. Understanding how it works is crucial for efficient power management and preventing issues. This section will explain how the switch affects power distribution depending on its position.The battery switch’s primary function is to direct power from your trailer’s batteries to the electrical system.
Most switches offer several positions, each controlling the flow of electricity differently. This allows you to conserve battery power, use only one battery at a time, or combine the power of both for increased capacity. Improper use can lead to unexpected power outages or damage to your electrical system.
Power Flow in Different Switch Positions
A typical battery switch offers three primary positions: “Off,” “Battery 1,” “Battery 2,” and “Both.” In the “Off” position, all power flow is interrupted, completely isolating the batteries from the trailer’s electrical system. This is essential for preventing accidental drain when the trailer is stored for extended periods. Selecting “Battery 1” connects only the first battery to the system, while “Battery 2” connects only the second battery.
Finally, “Both” connects both batteries in parallel, providing the combined power output of both.
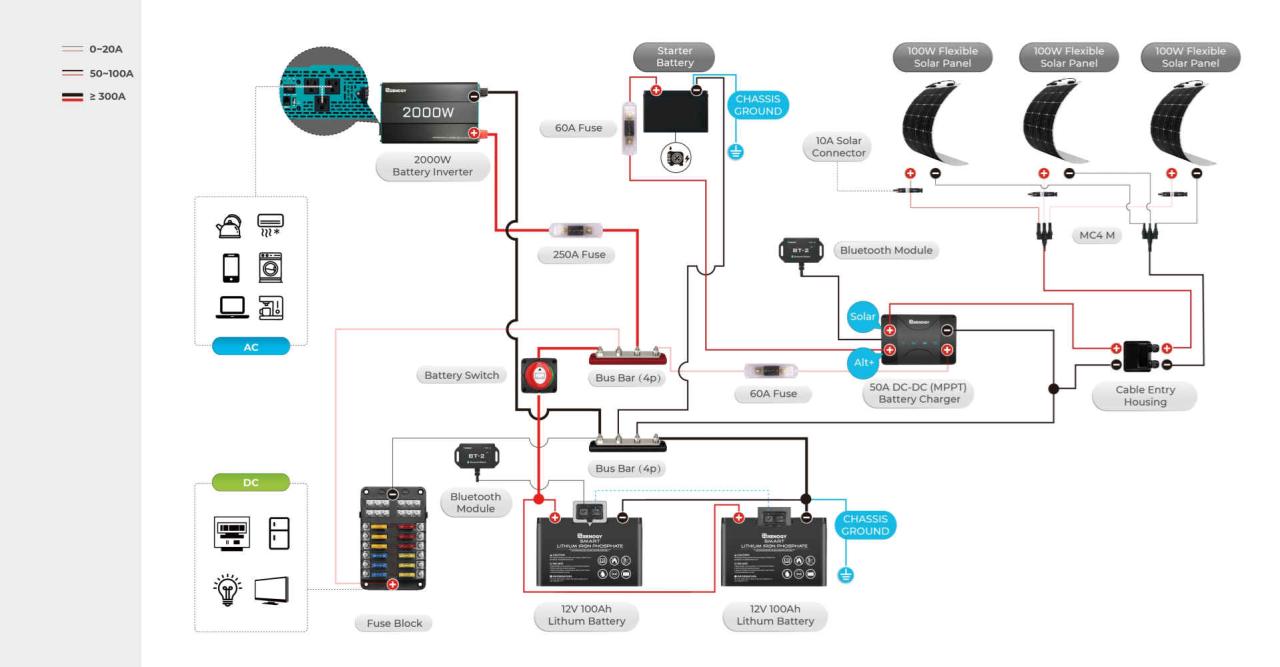
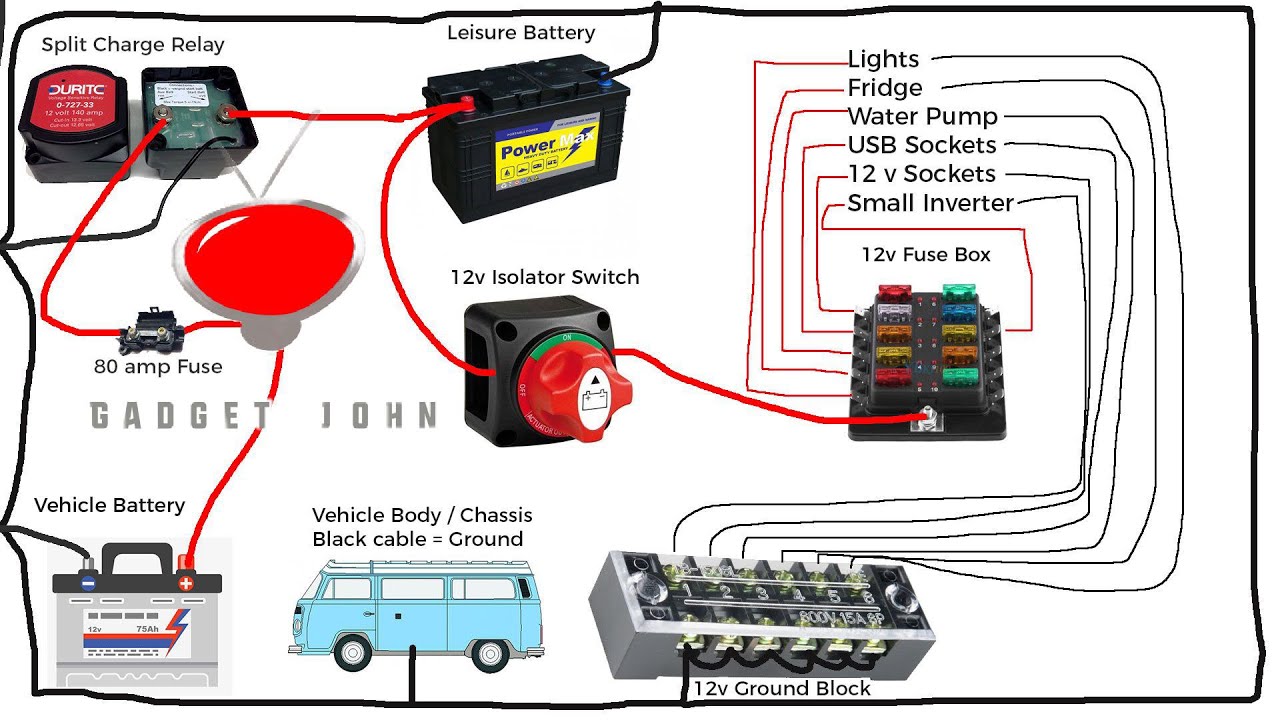
Diagram of Power Flow Through the Battery Switch
Imagine a simple diagram. We’ll represent the batteries as circles labeled “Battery 1” and “Battery 2.” The battery switch is a square box labeled “Battery Switch,” with several outgoing lines representing the different switch positions (“Off,” “Battery 1,” “Battery 2,” “Both”). These lines connect to a larger circle representing the “Trailer Electrical System,” which includes components like lights, appliances, and the 12V power distribution panel.When the switch is in the “Battery 1” position, a line connects “Battery 1” directly to the “Trailer Electrical System,” while “Battery 2” remains isolated.
In the “Battery 2” position, the connection reverses. In the “Both” position, lines connect both “Battery 1” and “Battery 2” to the “Trailer Electrical System,” indicating parallel connection. The “Off” position shows no connections between the batteries and the trailer’s electrical system.This diagram visually illustrates how the battery switch acts as a gatekeeper, controlling the path of power flow.
The choice of position dictates which battery or batteries provide power to the trailer’s electrical system. Incorrect selection can lead to unexpected issues, highlighting the importance of understanding the switch’s functionality.
Mastering your travel trailer’s battery switch is a fundamental skill for any RVer. By understanding the different switch types, practicing safe operating procedures, and performing regular maintenance, you can avoid frustrating power outages and ensure a reliable power supply for all your adventures. Remember, prevention is key! Proactive maintenance and a little knowledge can save you from costly repairs and unexpected downtime.
So, get to know your battery switch, and happy travels!
Query Resolution
What happens if I accidentally leave my battery switch in the “off” position?
Leaving the switch off will disconnect both batteries from the trailer’s electrical system, resulting in a complete power outage. You’ll lose power to all appliances and lights.
Can I use a battery switch to charge my batteries from shore power?
Yes, but only if your converter is wired correctly. The switch should be in the appropriate position (typically “both” or “on” for the battery being charged) to allow the converter to charge the batteries.
How often should I inspect my battery switch for corrosion?
Inspect your battery switch at least once a year, or more frequently if you notice any signs of unusual wear or performance issues. Pay close attention during periods of high humidity or wet weather.
My battery switch feels hot to the touch. Is this normal?
No, a hot battery switch is not normal and indicates a problem. Turn the switch off immediately and investigate the cause. Excessive heat can indicate a loose connection, high current draw, or a failing switch.
